


TRUE Terror.
Psh, FEAR has NOTHING on Gragas.
Double Gragas all the way across the sky...what does it mean?
Credit tojhoijhoi and Warlemming for the video. ^^
AP Gragas: Pentakill!!! GG!!! Reginald!!!
Abbreviations Throughout the Guide
Abbreviated Terms
CC = Crowd Control (Stun, fear, slow, snare, etc)
AP = Ability Power
AD = Attack Damage
MPen = Magic Penetration
CDR = Cooldown Reduction
OOM = Out of Mana
HP = Health/Health Points/Hit Points
DoT = Damage Over Time
AoE = Area of Effect
MRR = Magic Resistance Reduction
MRes = Magic Resistance
CS = creep score
MS = movespeed
Pros and Cons
Pros
-Extreme lane sustenance with
-All AoE damage, meaning you can instantly burst down MULTIPLE people at a time -- doing what LeBlanc does, but one step further ^^
-Has a slow
-Free flash every 5 seconds or so (depending on if you have blue and/or blue elixir or not)
-Terrific harass from a long range, and of course, it is AoE
-Crazy AP ratios (0.9 on
-Extremely tanky from
-AoE enemy team reposition with
-REALLY LOW COOLDOWNS!
-His extreme lane sustenance paired with his AoE safe harass and amazing farming and pushing capabilities makes him a top tier mid lane as well as top lane 1v1 OR 2v1
Cons
-Melee.
Farming


______Gragas is by far one of the easiest champions to farm and push with. All you have to do is toss a barrel in the middle of the enemy wave (in between the melee and caster creeps so it hits them all), and once you get your three
______That's all there is to it!
______Ideally, you should be aiming to hit 150-200 or so CS before 25 minutes. With Gragas, that is a piece of cake to do.
______Just remember, during the laning phase, you should try to just use
Team Work/Your Purpose On Your Team
______You are a key member to your team.
______With this build, you will be one of the, if not the only AP carry on the team, so you want to make sure you stay alive as long as you can to dish out the most damage possible. ABUSE your ability range and Body Slam: stay back in teamfights, be safe, and keep chucking your barrels. That will be more than enough of a contribution to your team. And if you get caught in a sticky situation or you are going to chase someone to the death, use your Body Slam as much as possible.
______And of course, Explosive Cask. You can use it to initiate a fight and screw up the enemy's positioning, use it to screw up their positioning DURING the fight, save it to stop a channeled ultimate such as
  Nunu's
  Absolute Zero,
  Galio's
  Idol of Durand,
  Katarina's
  Death Lotus, or
  Fiddlesticks's
  Crowstorm, or save it to stop an enemy from chasing an ally.
______Out of teamfights, make sure you farm, farm, farm, and gank when you can. If you see any enemy overextending, make sure to punish them for it. And, if they try to run from you, just Explosive Cask them right back to you. :)
______With this build, you will be one of the, if not the only AP carry on the team, so you want to make sure you stay alive as long as you can to dish out the most damage possible. ABUSE your ability range and
______And of course,
______Out of teamfights, make sure you farm, farm, farm, and gank when you can. If you see any enemy overextending, make sure to punish them for it. And, if they try to run from you, just
Laning, ganking, receiving ally ganks, and what to do when you get ganked.
I go SOLO TOP or MID with Gragas.
Why?
Why?
______As an AP carry, you scale extremely well with levels. You also need a lot of farm to have an extreme edge on your enemies. And, with the current meta, bot is dedicated to support/tank and AD range, jungle for the jungler (usually offtank), and mid and top for the two solos. Usually, mid is an AP carry, and in the US meta, top is someone very survivable, usually an offtank/melee DPS, or a survivable carry, such as Gragas. In the EU meta, usually there is an AP carry both mid and top, so Gragas works in both lanes there, too.
______Gragas is great top since he is very survivable, and as stated earlier needs to farm well. And, if the enemy does not have a jungler, you are still GREAT in top lane, since you have AoE safe harass. Meaning, you can still safely farm and harass the enemies, and prevent them from farming, even in a 2v1 lane; and then you will be a higher level than both of them, and since you don't have to worry about any ganks from an enemy jungle, you can easily pick up some lower level kills and overextend a bit. Gragas is one of the, if not THE best 1v2 champions to date.
Ganking
______If you take mid, you should try to gank whenever your enemy recalls. Harass them from a safe distance, make them recall, and when they DO, make sure to completely push the next wave, and then go top or bot, whoever needs more help, to gank.
What to do in a gank:
1. Make sure you are in range to land your ultimate. If you need to Body Slam to get into a good position to ult, make sure you premeditate where you are going to Body Slam, so you don't mess your positioning up.
2. Position your ultimate correctly. Make sure the dot in your ultimate's AoE circle is behind the enemies, so that when you ulti, you will be pushing them towards your allies and away from their turret. See the section titled "How to NOT fail with Explosive Cask." for more information on how to position your ultimate correctly.
3. DO IT. If you execute your premeditated Explosive Cask and possible Body Slam correctly, you should net your allies some kills. JOB WELL DONE!
1. Make sure you are in range to land your ultimate. If you need to
2. Position your ultimate correctly. Make sure the dot in your ultimate's AoE circle is behind the enemies, so that when you ulti, you will be pushing them towards your allies and away from their turret. See the section titled "How to NOT fail with Explosive Cask." for more information on how to position your ultimate correctly.
3. DO IT. If you execute your premeditated
______If you are laning at top, you should just focus on farming, safe harassing, and safe pushing; don't worry about ganks. Unless you know you can leave your lane for a few minutes with it still being safe. Remember, since you are top lane, to gank bot you would have to go all the way across the map and back. The only safe lane to gank without requiring a hold from your jungler would be mid. Other than that, or even if you just go to mid but don't think your lane can stay pushed away from your turret for the duration of the gank, make sure to get your jungler to hold your lane while you are away.
Receiving Ally Ganks
______If you are top or mid and your jungler or another ally comes to gank your lane, make sure to ultimate correctly, as described above. When they are ready, initiate the gank by ulting the enemy towards you and your ally, so then your ally can come in and help you secure the kill.
Getting Ganked
______If you get ganked by an enemy, you should ultimate the enemies AWAY from you (once again, see the section titled "How to NOT fail with Explosive Cask." for more info on correct ultimate usage), and then
Runes
| RUNES | |||||||||||||||

Greater Marks of Insight
All of Gragas's abilities are dealt as magic damage, and as such you want magic penetration. This extra MPen is very helpful along with your masteries (if you follow my setup), your

Greater Seals of Vitality
With these, it is quite an easy choice. Besides these being half the price of the flat Seals of Fortitude, they give around 4 times as much health at level 18. Scaling Seals of Vitality also have a larger amount of total HP per rune turnover once you hit level 5, which, since I solo lane, I hit quickly, and even side-laning you hit quickly. Flat HP seals are only really helpful for jungling, since they only grant more HP really early game, and we are not jungling with Gragas in this guide.
You want health seals to, well, give you some more health! With your
As well, as explained in the "Items" section, more HP lets you be more tanky overall, against both magic and physical damage (since you will have more HP, which allows you to take more reduced damage from ALL sources).
In total, 9 of these seals give around 180 extra health at 18, which helps a lot considering you don't have to spend any gold in-game to get the extra HP.
You can take dodge runes, but I just prefer having a stat that you KNOW you will have (HP), whereas dodge is a random chance; it may be there when you need it, it may not, it may happen 5 times in a row, it might not for 100 hits. You just don't know.
As well, the reason I take HP over armor and MRes is because you don't know the enemy team comp; they could be magic or physical damage heavy, but HP works for any enemy. And, as just explained, in Gragas's case, more HP in combination with

Greater Glyphs of Force
These runes help a ton. Since you are an AP carry, you want, well, AP! These runes alone will give you 27.5 AP, which is amazing considering you don't have to pay any gold for them! At level 18, these runes give more AP than an

Greater Quintessence of Potency
These quints are amazing to take with Gragas. As mentioned previously, any extra AP you can get helps immensely, and these runes work with your Deathcap as well. I take these over the scaling Greater Quintessence of Force because they affect early game a lot (around 15 AP right off the bat, without any items, just from these runes!). Along with your
Masteries
| MASTERIES | |||||||||||||||||
1/3
 |
3/3
 |
4/4
 |
1/1
 |
3/3
 |
1/3
 |
4/4
 |
3/3
 |
2/2
 |
3/3
 |
1/1
 |
3/3
 |
1/1
 | |||||
Offense Mastery Tree
 | space | Tier 1 - You want the extra AP from Tier 2 - You want to take the CDR from Tier 3 - The extra magic penetration from |
Utility Mastery Tree
| Tier 1 - I take the 3 points in To quote Jebus McAzn,
Jebus McAzn wrote:
Perseverance gives an additional 4% regeneration to health and mana. Say you have 100 health per 5, an obscene number. That means you gain an additional 4 health per 5, or less than 1 health per second, which is really quite insubstantial compared to the bonuses from, say, Strength of Spirit. In terms of usefulness, Perseverance isn't quite worth it.
Good Hands potentially means 5-8 seconds off your death timer, which could be gamechanging. As you can see, Tier 2 - We take Tier 3 - The mastery selections are pretty obvious from here. We don't need the measly extra few gold from Tier 4 - Here we get everything, which is more move speed from Tier 5 - Here we get some more CDR, which synergizes well with Tier 6 - Finally, we get 15% reduced cooldowns on both summoner spells with | space |  |
Skills, Skill Sequence, and Skill Combo
| ABILITY SEQUENCE | |||||||||||||||||
| 1 | 2 | 3 | 4 | 5 | 6 | 7 | 8 | 9 | 10 | 11 | 12 | 13 | 14 | 15 | 16 | 17 | 18 |

Happy Hour
This passive is truly amazing, and part of the reason why you have such great lane sustenance. Every time you cast a spell, you heal. At level one, you have around 600 HP with
Barrel Roll
This is your main harass, farming, and damaging tool, all on a low base cooldown of 7 seconds, going to around 5 with these masteries, blue elixir, and blue buff. With a 0.9 AP ratio, you will literally burst (get in, coz your barrel bursts, ahue) people's health down. All at a safe range of 1100. :)
NOT ONLY do you use this ability to one shot creep waves, burst people down, and harass, but it ALSO has a nasty 3 second 40% attack speed slow at level 5 of the ability, meaning that, not only will you be bursting those squishy ranged AD carries in teamfights, but you will be GREATLY debuffing them, causing them to attack less often, and as such deal less overall damage to you and you teammates for the duration of the debuff. And since the debuff lasts 3 seconds, and you will get your
And, of course, you can click Q again to detonate the barrel early, which you should almost always be doing.
Just remember, the barrel takes a short amount of time to reach its destination, so predict the paths the enemies can take, and where they will go when they see you chuck a barrel. You have some leeway, considering it is AoE, however.
I learn this ability first so that from level 1, I can be harassing and farming safely. I max it first, since as mentioned, this is your core, your bread and butter, the ability that you will spam most often, the ability you use for harass, and farming; and as such, you want to get the most out of it as soon as possible.

Drunken Rage
One of my favorite abilities in the game. It makes you naturally more tanky than most tanks, without actually having any tanky items at all. Best part of it is, while armor can be shredded by Armor Penetration and Reduction, and Magic Resistance by Magic Penetration and Magic Resist Reduction, NOTHING can reduce the amount of damage reduction Gragas takes, from ALL sources (of course true damage bypasses this, however, but it also bypasses armor and MRes).
The mana from it is nice to let you cast an extra spell or two if you are running low, and the extra AD sure helps for pushing down towers, farming with your melee attacks if you are out of mana, adding some extra damage to
Use this ability whenever it is up, to almost always have the extra AD and damage reduction. I max this spell last, since you will need MORE damage reduction when the enemy gets MORE damage, which is later in the game. Until then, however, I choose to deal more damage myself by maxing
Body Slam
Please see the section titled "How to use Body Slam efficiently." for more information on this ability, as well as the section titled "Laning, ganking, receiving ally ganks, and what to do when you get ganked." to learn how to use this ability to gank and escape getting ganked. This ability is amazing. It is a low cooldown flash, AoE damage dealer, AND slow. It helps you escape, gap close, initiate ganks, and more. Once again, please read the sections I mentioned for more info on how to use this ability to its full potential.
Just remember, the Slam takes a short amount of time to get you to your destination (that amount of time decreases with each level up), so predict the paths the enemies can take, and where they will go when they see a fluffy man flying towards them. You have some leeway, considering it is AoE, however, and you get to your destination quite quickly, but there is still some room for the ally to dodge if they can predict your path ahead of time, so be aware.
I max this ability second, because, as mentioned previously,
HOWEVER, you should NEVER learn your abilities right off the bat except in some rare cases. Learn this ability FIRST if you get caught in a level 1 teamfight or gank and need an escape and/or gap closer more so than a ranged harass for one level, and don't feel like blowing  Flash.
Explosive Cask
One hell of an ultimate. On a crazy low cooldown, with a 1.0 AP ratio, and an AoE enemy reposition, this ability sure packs a punch. The main cheese for your combos, very versatile in teamfights, great for initiating fights and ganks, great for escaping certain death or protecting an ally, and much, much more. To find out all of these uses of this ability, as well as how to use it correctly, please see the section titled "How to NOT fail with Explosive Cask.", as well as the section titled "Laning, ganking, receiving ally ganks, and what to do when you get ganked." to learn how to use it during ganks, and the section "Team Work/Your Purpose On Your Team" to learn how to utilize it in teamfights.
Learn it whenever you can.
Skill Combo
______A pretty basic combo to pull off, used in teamfights, ganks, in lane when trying to grab a kill, etc.
______Of course, use
______You generally want to open up with your ultimate,
______Not a hard combo to pull off but a hard one to master and pull off in any situation.
Ability Range Screenshots
Barrel Roll
Range to Center of AoE: 1100 Approximate Radius of AoE: 375 
Body Slam

Explosive Cask
Range to Center of AoE: 1050 Approximate Maximum Knockback Distance: 800 
How to use Body Slam efficiently.
______ Body Slam is an extremely versatile skill. Not only does it deal nice AoE damage, but it also has a 35% AoE 2.5 second slow. If that isn't enough, it is also a quick dash that is basically the distance of Flash. This means you can use it to get over most walls that you would be able to with Flash, with some exceptions (the only one I really noticed was that you can't Body Slam over the middle part of the outer base wall, but you can on the edges}.
______This means that you can use it as you would Flash: to initiate, to close gaps while chasing people, to escape, etc. The big difference here, is that Body Slam is on a measly 7 second base cooldown! With blue buff and blue elixir, this means you can "flash" every 5 seconds!
______For more info on how to use this ability to gank and escape ganks, please look back at the section titled "Laning, ganking, receiving ally ganks, and what to do when you get ganked."
______This means that you can use it as you would
______For more info on how to use this ability to gank and escape ganks, please look back at the section titled "Laning, ganking, receiving ally ganks, and what to do when you get ganked."
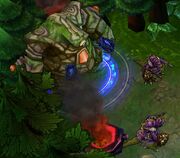
How to NOT fail with Explosive Cask.
______Isn't it always annoying when your ally Gragas ultimates someone you were about to kill AWAY from you? Or when you are running away from a pursuer, and he ultimates them TOWARDS you? Everyone knows Grasshyren's Fiddlesticks video, where the enemy Janna ultis him TO to person that he was draining, and picks up the kill from that. Mistakes do happen, but hopefully reading this section will help you to make...less of them.
______If you look at the AoE circle of Gragas's ultimate before casting it, you will notice a tiny dot in the center. That is the location you should always be looking at right before casting your ultimate to make sure the enemy goes where you want him/her to.
______For instance, in this case, if you want Annie to come TOWARDS you, you would make sure the dot is BEHIND her, like so:

______NOT so that the dot is in FRONT of her, or else she would be pushed BACK, like so:

______Of course, if you WANTED her to be pushed back, you would put the dot in FRONT of her, not BEHIND her.
______The same thing would apply if someone is to the side of you: just ALWAYS focus on the dot, and make sure that your target is in FRONT of the dot if you want them to come towards you, and BEHIND the dot if you want to push them away.
______Same thing with MULTIPLE targets. If you want to single someone out in a teamfight, try to position your ult so that the target you want pushed towards you is in front of the dot, and everyone else is behind it. It may take some waiting to get the enemies where you want them, but timing is key with his ult. Mess it up, and you can ruin the whole teamfight; land a good ult and you can give a key advantage to your team.
______Just remember, the cask takes a short amount of time to reach its destination, so predict the paths the enemies can take, and where they will go when they see you chuck a big cask at them. You have some leeway, considering it is AoE, however, but just make sure you toss it far enough in front of or behind the enemy that if they move a little, they will still be on the side of the dot that you want them to be on. If they are really close to going to the wrong side, you should wait to chuck your cask until it is a bit more certain.
______Placing his ult correctly isn't a hard concept, in fact it is really easy to do once you get the hang of it! It just requires patience so that you don't screw it up big time.
Summoner Spells
RECOMMENDED

Ignite
This is a key spell to use in your combo. Great for grabbing kills you wouldn't have otherwise, allowing you to get more fed than you would without ignite. Don't underestimate the damage of it, either. At level 18 it adds a whopping 410 true damage to your combo, which is a good percentage of a squishy's health. Not only that, but it also reduces healing on the target by 50% for the duration (5 seconds). Great for finishing off people who would have otherwise healed, as well as using on a target that can heal themselves BEFORE your combo, so they won't be healing as much during it, and as such you will deal more overall damage to them; such targets are Dr. Mundo and
  Swain. Great spell overall for AP Gragas as well as any other carries. To see a chart displaying the damage that ignite deals per level, click here.
Flash
A must-have spell for any caster, and basically any champ in the game, even Gragas who already has a built-in "flash", per se. Using this along with your Body Slam gives you a "double flash" effect, letting you EASILY escape enemies, close any gaps, initiate any fights, get out of turret range, and more. It also comes in handy when Body Slam is down (which is rarely, however), and to go over walls that you can't with Body Slam (as mentioned previously, only ones I really noticed and tried were the middles of the outer base walls, but still). Another terrific spell for AP Gragas, and for basically anyone at that.
MEH

Ghost
Meh. You just don't need it. You have plenty of mobility with Body Slam and Flash already, you are better off using your 2nd summoner spell slot for more burst to your combo, in the means of Ignite.

Cleanse
This is an okay spell to take, really only if you are in ranked though and you notice off the bat that basically every enemy has heavy CC. You can just Cleanse and then Body Slam and/or Flash out. You can't rely on that happening every game in normals, though, so definitely don't take this spell in a normal game, assuming that their whole team is full of CC every single game that you play with Gragas. And, even if they are, I still wouldn't highly recommend this spell, since you can add more damage to your combos by keeping Ignite, and just buy  Mercury's Treads BEFORE your
  Void Staff and/or a
  Quicksilver Sash.

Exhaust
Meh again. You just, don't need it. Leave it to the AD carries. I mean, for a slow, you have your Body Slam at about the same range as Exhaust, plus it is AoE. You have debuffs in the form of your attack speed slow with Barrel Roll. And if they are getting away from you, Explosive Cask them back. If you are getting chased, give them a nice Explosive Caskto the face.
NO...JUST...NO

Clarity
"Oh, but Gragas is so mana hungry!!!1!1!"
No...just...no. Clarity is just a bad spell overall, it is OK if you are a new player that can't control your mana usage, but if you have decent knowledge of the game, you know that you shouldn't take this spell. It is just basically a waste of a slot that you can use for a more useful spell, such as Ignite or Flash. For your mana issues, Drunken Rage paired with triple Doran's Rings is more than enough to keep you spamming your abilities early game, and later in the game, your jungler should always be letting you take blue buff, and that paired with an expanded mana pool from  Rod of Ages is more than enough to let you cast as you please all through mid and late game.
Any spell not mentioned is a definite no-no for obvious reasons, too obvious to even spend my time discussing.
Ignite
This is a key spell to use in your combo. Great for grabbing kills you wouldn't have otherwise, allowing you to get more fed than you would without ignite. Don't underestimate the damage of it, either. At level 18 it adds a whopping 410 true damage to your combo, which is a good percentage of a squishy's health. Not only that, but it also reduces healing on the target by 50% for the duration (5 seconds). Great for finishing off people who would have otherwise healed, as well as using on a target that can heal themselves BEFORE your combo, so they won't be healing as much during it, and as such you will deal more overall damage to them; such targets are
Flash
A must-have spell for any caster, and basically any champ in the game, even
MEH
Ghost
Meh. You just don't need it. You have plenty of mobility with
Cleanse
This is an okay spell to take, really only if you are in ranked though and you notice off the bat that basically every enemy has heavy CC. You can just
Exhaust
Meh again. You just, don't need it. Leave it to the AD carries. I mean, for a slow, you have your
NO...JUST...NO
Clarity
"Oh, but Gragas is so mana hungry!!!1!1!"
No...just...no. Clarity is just a bad spell overall, it is OK if you are a new player that can't control your mana usage, but if you have decent knowledge of the game, you know that you shouldn't take this spell. It is just basically a waste of a slot that you can use for a more useful spell, such as
Any spell not mentioned is a definite no-no for obvious reasons, too obvious to even spend my time discussing.
Items
Here is where I will tell you when to get what items, explain why I use the items that I use, and the effects of them on Gragas.
NOTE: Try to buy an Elixir of Brilliance whenever you recall right before you know a teamfight is going to happen and you have the extra gold, or if you just built or bought an item and have some gold to spend. You can even buy one of these elixirs if you recall and don't have enough gold for any other items that you want to get yet (just don't go overboard on the elixirs, as you still need enough gold to buy your main items). The elixir gives you some more AP and some CDR, which, for a measly 250 gold, doesn't hurt at all. This is especially helpful early game, where that 25 or so AP plus the CDR has a huge effect, when your AP is low and CDR is measly.
ANOTHER NOTE: If you still have some leftover gold after your purchases, and some open slots, ALWAYS TRY TO BUY WARDS! Don't rely on your jungler to ward your lane if you are top or mid, although many times they will. Still, if you have the extra gold, buy some Sight Wards, you will not regret it! WARDS SAVE LIVES!

Doran's Ring
This item is a must have to start with on Gragas, as well as most other AP carries. Not only does it regen your mana quicker to allow you to cast more early game (to farm, harass, kill, gank, etc.) but it also gives you more AP and HP, and along with your masteries and runes, your AP will be at 32 right once you purchase this item -- amazing to have right off the bat. This mana regen and extra health also lets you stay top or mid, or whichever lane you happen to be in, longer, and ultimately get XP quicker and have an even higher level advantage over other enemies, allowing you to gank easily if need be, and push and farm well. Once you run out of room in your inventory, simply sell a Doran's Ring and continue on with your purchases.
WHY DO YOU STACK DORAN'S RINGS?
So many people do not realize the benefit of stacking Doran's items. Let me put this into your mind. The stats that you get from a Doran's Ring are worth well over what you pay for, and they increase your staying power and performance early game tenfold. The AP adds to your punch early game, helping you farm and harass much easier, and allowing your harass and combos to deal more damage, letting you net more kills overall. The HP lets you take more hits without having to go back. In Gragas's case, the extra HP also means that you will be healing for more after each ability use from your passive, Happy Hour. Early game, 100 HP is a LOT. The mana regen lets you cast your abilities to harass and farm more often without having to worry about being OOM. If that isn't enough, when you sell the Doran's Ring, you get back 238 gold, meaning, basically, that you only payed 237 gold for the item! Definitely a game changing item, if you stack them early game. The benefits they give you pay back for the extra gold you spent on them, in the form of extra kills and more farm.
HOWEVER, if you are having a great early game and manage to farm well enough before you recall to afford a Needlessly Large Rod or
  Catalyst the Protector, invest your gold in those instead, and skip the stacking. The stacking is most useful if you need some extra "oomph" and you aren't farming well. Get the Rings if you don't have enough gold for a Large Rod or Catalyst when you recall, but if you do, get the Rod or Catalyst instead.

Sorcerer's Shoes
Gives you flat Magic Penetration, which, tied with your runes and masteries, will let you deal near-true damage to anyone before they get MRes, which usually isn't until mid-late game. Then, you will get a Void Staff to keep up with dealing as close to true damage as you possibly can. Once you get said Void Staff, you will be selling these shoes for Mercury's Treads. The reason for doing this is because flat MPen is applied BEFORE percentage MPen, such as the Void Staff. To quote the League of Legends wikia, "Because the percentage magic penetration is applied last, its effectiveness is reduced the more flat magic penetration you already have or the more magic resistance reduction has been applied to the target. For example, if the target has 100 magic resist and you only have 20% magic penetration, you will penetrate 20 of the target's magic resistance. If you also have 20 magic resistance reduction, the same 20% magic penetration will only penetrate 16 of the target's magic resistance." So, although keeping Sorcerer's Shoes will allow you to still deal some more damage to your targets, the reduction of the effect of the Void Staff makes the Sorcerer's Shoes MUCH less useful than they were before the Void Staff, and ultimately, Mercury's Treads become infinitely more useful at that point in the game. Both because Sorcerer's Shoes become less useful, and because at that point in the game, everyone is dealing some heavy damage, so the MRes and Tenacity from the Treads will sure come in handy.
If an enemy gets Mercury's Treads, these shoes along with your runes and masteries will counter the MRes from them and still reduce some base MRes.
I get these boots before my Rod of Ages because, to quote DuffTime,
By 2, he means of course Enhanced Movement 2, not literally 2 more movespeed :P
I don't start with boots 3 pots because you have good mobility with Body Slam already, and you don't really need the health pots since you have Happy Hour. With Doran's Ring, you get more HP which synergizes very well with Happy Hour, more mana regen which also lets you stay in lane longer and farm and harass much easier, and AP for a more painful harass. This would be a different story if you weren't so mana hungry and you didn't have Happy Hour, but since both apply, Doran's Ring is definitely the way to start off.
Rod of Ages
A must-have on Gragas. You need the Catalyst the Protector for extra early game lane sustenance, and this item builds from it. It grants a nice amount of AP (80, 104 with  Rabadon's Deathcap), as well as a large mana pool, which helps a TON to allow you to cast more often; it also gives you a hefty amount of HP, which, in combination with Drunken Rage, lets you be more tanky overall, against both magic AND physical damage (since you will have more HP, which allows you to takemore reduced damage from ALL sources). I get this item before Rabadon's Deathcap so that we have a higher chance of getting all that we can out of this item, since it takes 10 minutes after purchase to grant the full stats that it offers. Rod of Ages is a better use of your Catalyst for Gragas than
  Banshee's Veil since you get HP from Rod too, and you already have the built in resistances from Drunken Rage. As well, we are already getting MRes from the
  Lich Bane and Mercury's Treads later on, so we don't need the Banshee's MRes and bubble TOO. Rod of Ages is definitely a great, great item for AP Gragas.

Hextech Revolver
Will be built into a Will of the Ancients later. Useful to get the spell vamp as soon as possible for even higher lane sustenance and teamfight durability.
Rabadon's Deathcap
This item is just amazing. You want to rush this item after the Rod of Ages for the insane amount of AP that it grants (140) plus the passive 30% increased total AP. Getting this item early also means that every item that grants AP that you get after it will have the additional 30% extra AP added to it right off the bat. At the end of this build, including runes but not masteries nor blue elixir, the passive ALONE from this item grants an additional approximate 150 AP, resulting in about 290 AP just from this item alone. At the end of this build, including masteries and runes, but not blue elixir, you will hit about 650 AP. With blue elixir, approximately 700 AP. Of course, you will have even MORE AP if another ally gets a Will of the Ancients as well, which is common if you have two APs on your team (one being yourself, of course). You will get 30 AP from the aura, so 39 AP with Deathcap, resulting in around 690 AP without blue elixir and about 740 with. Remember, this is if there is a second Will of the Ancients on your team, and you are in range of the owner's aura. And, you can only have up to two Will of the Ancients auras if you own one, one from you and one from the ally that owns one as well.
A must-have for Gragas, as well as for every other AP carry in the game.
Will of the Ancients
This item, in my opinion, is core on basically EVERY AP carry, ESPECIALLY Gragas. The stats it gives for the cheap price are just too hard to pass up, and they help the whole team, too!
Of course this item gives nice AP, and a good aura for your teammates, but the real thing that we are looking for here is the spell vamp. We don't need a Hextech Gunblade, the only other item besides Will of the Ancients that provides spell vamp, since the AD and life steal, almost half of what you're paying for, aren't too useful for us in this build. The AP granted from Hextech Gunblade is slightly lower than from Will of the Ancients, and the spell vamp is the same. The Gunblade also has a single target mini-nuke and slow, but it is around the same range as Body Slam with only a 30% slow for 0.5 seconds longer, yet on a one minute cooldown versus around 5 seconds with Body Slam, and single target, versus AoE with Body Slam. As well, Gunblade doesn't provide a helpful teammate aura while Will of the Ancients does. Lastly, and the real big hook here, is that Will of the Ancients is a little over half the price of Hextech Gunblade. As you can see, for spell vamp, Will of the Ancients has more of what we need for a cheaper price.
Now that we have established that this is THE item to get for spell vamp for Gragas, why do we want to get spell vamp? You may be thinking that spell vamp on Gragas is pretty underwhelming, since all of his damaging abilities are AoE, and only 33% effect is applied to AoE spells from Will of the Ancients. However, keep in mind, the 33% is applied to EACH TARGET SEPARATELY. Meaning, if you have three targets dealt the same amount of damage from an AoE ability versus one target dealt that damage from a single target ability, both abilities would heal for the same amount.
Now consider this. MORE than three targets. How about a whole team of five champions? How about a whole wave of 20 creeps?
You heal for a LOT. And by a lot, I mean a LOT.
Say there is a wave of 20 creeps with 500 health points, all full health, and your Barrel Roll does 600 damage, meaning you can one shot all of the creeps. Since you have 25% spell vamp, if your spell wasn't AoE, you would be healing for 25% of 500, or 125. However, since it IS AoE, you will be healing for one third of that: about 42. But, multiply that now, by the 20 creeps, and you just healed for 840. Of course, usually creeps won't all be at full health, nor bunched up in a group of 20, and a lot of targets have magic resistance, so that becomes a factor, but this is just to show how much you can heal from over three targets with an AoE spell and spell vamp.
And this is good for sooooooooo many reasons on Gragas.
First off, you have your passive Happy Hour. That, along with spell vamp, will heal you for that much more. Spell vamp and Happy Hour synergize extremely well, it is as if they were meant to be together.
Since you have low cooldowns on all of your abilities as Gragas, you can CONSTANTLY use your AoE abilities to CONSTANTLY heal on the battlefield. You will be healing almost as quickly as if you were on the summoner platform itself!
If you have blue buff, you basically never have to recall once you have this item. If you are getting low, find a creep wave, and bingo, you are back at full health, and you have full mana from blue buff.
Where this REALLY helps out is in teamfights. Keep in mind, your abilities are AoE, so you will be healing from all of the damage that you deal to everyone in the fight. Also, do you remember your passive, Drunken Rage? It reduces ALL incoming damage by 18%. Now, this is kind of like an effective health relationship with Gragas. Since you will be taking reduced damage from EVERYTHING, MORE health will let you take even MORE REDUCED DAMAGE. The reduced damage from Drunken Rage, in essence, gives you more health, since you are absorbing more damage than you usually would. If you have MORE health points, or a HIGHER health bar to absorb that much more damage, it will keep you up that much longer. Here is where spell vamp comes in. If you heal from spell vamp, you will be getting more health, both from actual health points and effective health from the reduced damage from Drunken Rage. Meaning, in essence, if you heal for 300, you will be actually healing for more than that, not numerically, but theoretically, when you have Drunken Rage on.
Also, as mentioned throughout the guide, Gragas can escape from people and kite very well with [{Body Slam]] andExplosive Cask. If you have spell vamp, there is a really cool trick you can do. You can run from a group of pursuers, or however many people there are trying to chase you down, and constantly chuck barrels behind you. Not only will this be damaging your pursuers, making them easier to kill and discouraging them from continuing to chase you, but you will also be healing yourself. If you do this a few times, you will end up being higher health than your pursuers, and can end up turning around if they are still blind enough to chase you and own their faces. This, my friends, is what I like to call kiting with spell vamp.
Overall, this item is one of the best items that you can get on Gragas and most other AP casters. It can definitely change the tide of a game, especially considering it has an aura, and is so cheap. If an ally AP gets one as well, that is, if you have another AP on your team (many APs DO buy this item), then you will get even MORE spell vamp AND AP, doubling the already astounding healing you get from 25% spell vamp whenever you are near said ally. If you DO happen to have a 2nd AP on your team, which isn't too uncommon, convince them to buy a Will of the Ancients, too! :)
A MUST-BUY on Gragas.
Void Staff
This item is necessary to pick up late game. More often than not, when the enemy sees your crazy damage, they will be buying some Magic Resistance to counter you. How to counter them countering you? Void Staff. It gives you percentage MPen, which, along with your Sorcerer's Shoes and your masteries and runes, will let you shred through ANYONE, whether a squishy with only base MRes or a tank with 5 Forces of Nature. Of course, this item also gives some nice AP.
Why do I get this item over Abyssal Scepter? Well, in the current meta, more enemies than not are tanky, so Abyssal Scepter won't reduce enough enemy MRes for you to deal as much damage as you would with Void Staff. Also, you don't really need the MRes from this item, since you have the damage reduction from all sources with Drunken Rage, and Lich Bane as well as Mercury's Treads for MRes. As well, and this is the big reason, the range of the Abyssal aura is 1000. The ranges of both of your most used, long ranged harass, damaging AoE abilities, Barrel Roll and Explosive Cask, are over that. A good portion of fights you may very well be out of aura range. Must I say more?
Mercury's Treads
I swap my Sorcerer's Shoes out for these late game, because, as mentioned in the Sorcerer's Shoes section, these boots just become much more useful than Sorc's do late game. For more info on why they are more useful, please check back to the Sorcerer's Shoes section. Also, since the sell value for Sorcerer's Shoes is 770, you are essentially only paying 430 gold for these boots, which are worth way more than that at this time in the game.
Lich Bane
This item synergizes really well with Gragas's kit. Since you will be using Body Slam in fights, you can simply Body Slam into an auto attack and the lich bane proc will hurt them...a lot. You also get MRes from this item, which certainly doesn't hurt. The AP, mana, and movespeed help a lot too, for obvious reasons. A nice late game pick for Gragas. I get this item last because it isn't as core as the other items in the build, but adds some nice, helpful stats and a little more punch to your combos, a perfect item to finish off with.
Elixir of Brilliance
This is the item to just keep spending your gold on if the game is STILL going and you have completed your item build. If you have all 6 item slots full, as you should if you are buying this item at the end, it will automatically be consumed for you. It gives some nice AP (over 50 with Rabadon's Deathcap at level 18) and CDR, which helps a load.
NOTE: Try to buy an
ANOTHER NOTE: If you still have some leftover gold after your purchases, and some open slots, ALWAYS TRY TO BUY WARDS! Don't rely on your jungler to ward your lane if you are top or mid, although many times they will. Still, if you have the extra gold, buy some
Early Game
Doran's Ring
This item is a must have to start with on Gragas, as well as most other AP carries. Not only does it regen your mana quicker to allow you to cast more early game (to farm, harass, kill, gank, etc.) but it also gives you more AP and HP, and along with your masteries and runes, your AP will be at 32 right once you purchase this item -- amazing to have right off the bat. This mana regen and extra health also lets you stay top or mid, or whichever lane you happen to be in, longer, and ultimately get XP quicker and have an even higher level advantage over other enemies, allowing you to gank easily if need be, and push and farm well. Once you run out of room in your inventory, simply sell a
WHY DO YOU STACK DORAN'S RINGS?
So many people do not realize the benefit of stacking Doran's items. Let me put this into your mind. The stats that you get from a
HOWEVER, if you are having a great early game and manage to farm well enough before you recall to afford a
Sorcerer's Shoes
Gives you flat Magic Penetration, which, tied with your runes and masteries, will let you deal near-true damage to anyone before they get MRes, which usually isn't until mid-late game. Then, you will get a
If an enemy gets
I get these boots before my
DuffTime wrote:
Sorc shoes before RoA and you're golden...delay of Sorc boots is not worth the rush of RoA which will be just fine if you get it 3 min or so later.
That 20 Mpen and 2 move speed will benefit you too much in game.
That 20 Mpen and 2 move speed will benefit you too much in game.
By 2, he means of course Enhanced Movement 2, not literally 2 more movespeed :P
I don't start with boots 3 pots because you have good mobility with
Rod of Ages
A must-have on Gragas. You need the
Hextech Revolver
Will be built into a
Mid Game
Rabadon's Deathcap
This item is just amazing. You want to rush this item after the
A must-have for Gragas, as well as for every other AP carry in the game.
Will of the Ancients
This item, in my opinion, is core on basically EVERY AP carry, ESPECIALLY Gragas. The stats it gives for the cheap price are just too hard to pass up, and they help the whole team, too!
Of course this item gives nice AP, and a good aura for your teammates, but the real thing that we are looking for here is the spell vamp. We don't need a
Now that we have established that this is THE item to get for spell vamp for Gragas, why do we want to get spell vamp? You may be thinking that spell vamp on Gragas is pretty underwhelming, since all of his damaging abilities are AoE, and only 33% effect is applied to AoE spells from Will of the Ancients. However, keep in mind, the 33% is applied to EACH TARGET SEPARATELY. Meaning, if you have three targets dealt the same amount of damage from an AoE ability versus one target dealt that damage from a single target ability, both abilities would heal for the same amount.
Now consider this. MORE than three targets. How about a whole team of five champions? How about a whole wave of 20 creeps?
You heal for a LOT. And by a lot, I mean a LOT.
Say there is a wave of 20 creeps with 500 health points, all full health, and your
And this is good for sooooooooo many reasons on Gragas.
First off, you have your passive
Since you have low cooldowns on all of your abilities as Gragas, you can CONSTANTLY use your AoE abilities to CONSTANTLY heal on the battlefield. You will be healing almost as quickly as if you were on the summoner platform itself!
If you have blue buff, you basically never have to recall once you have this item. If you are getting low, find a creep wave, and bingo, you are back at full health, and you have full mana from blue buff.
Where this REALLY helps out is in teamfights. Keep in mind, your abilities are AoE, so you will be healing from all of the damage that you deal to everyone in the fight. Also, do you remember your passive,
Also, as mentioned throughout the guide, Gragas can escape from people and kite very well with [{Body Slam]] and
Overall, this item is one of the best items that you can get on Gragas and most other AP casters. It can definitely change the tide of a game, especially considering it has an aura, and is so cheap. If an ally AP gets one as well, that is, if you have another AP on your team (many APs DO buy this item), then you will get even MORE spell vamp AND AP, doubling the already astounding healing you get from 25% spell vamp whenever you are near said ally. If you DO happen to have a 2nd AP on your team, which isn't too uncommon, convince them to buy a
A MUST-BUY on Gragas.
Late Game
Void Staff
This item is necessary to pick up late game. More often than not, when the enemy sees your crazy damage, they will be buying some Magic Resistance to counter you. How to counter them countering you?
Why do I get this item over
Mercury's Treads
I swap my
Lich Bane
This item synergizes really well with Gragas's kit. Since you will be using
Elixir of Brilliance
This is the item to just keep spending your gold on if the game is STILL going and you have completed your item build. If you have all 6 item slots full, as you should if you are buying this item at the end, it will automatically be consumed for you. It gives some nice AP (over 50 with
Why no  Rylai's Crystal Scepter?
Why no  Zhonya's Hourglass?
______The MAIN reason why I don't take
______Why isn't it useful? Think about this. It is a TERRIFIC item on
______If you DO happen to get caught in the middle of a fight and are taking some serious damage, that is when someone like
______With Gragas, basically,
Other Optional Situational Items
NOTE: THESE ITEMS CAN REPLACE ANY ITEM IN THE BUILD THAT YOU CHOOSE. THINK WISELY, HOWEVER, OF WHAT ITEM(S) YOU CHOOSE TO REPLACE WITH THESE SITUATIONAL ITEMS. IF YOU DO NOT NEED THESE ITEMS TO IMPROVE YOUR GAME AGAINST YOUR ENEMIES, DON'T BUY THEM.
Generally, however, if you end up actually getting to a full build, and you don't know which item you should skip for one of these, drop the Sorcerer's Shoes for the Mercury's Treads, obviously, and for the other two items, Void Staff if they are mostly squishy (since it won't help too much), or the Lich Bane if they are mostly tanky (since you need Void Staff to do more damage to them, but they won't do as much to you, so you can afford to have less defenses in the form of MRes, and the extra burst from the Lich Bane proc won't be as effective; as well, you should usually get both  Mejai's Soulstealer and Quicksilver Sash early game if you do, and Lich Bane is the LAST item in the build, so your build will be completed in the same order, just one item short). Although you generally want all of the items in the main build if the game goes long enough to permit.
Quicksilver Sash
This item is good against enemies with a lot of CC (Kennen, Morgana, Lux, Vlad, etc) if you do not have cleanse with you. It is cheap and has a cleanse-like active. It removes ALL debuffs from your character. Yes, this includes things that cleanse won't remove, such as damaging debuffs like Vlad's ulti, Malz's ulti, EVERY single debuff to you. Just use the active and Body Slam and/or Flash out of there. Keep in mind, if they CC/debuff you again right after you use the active, it won't have a reduced effect as it does with Cleanse. BE CAREFUL OF THAT. This item also gives a good amount of MRes, which is nice against these types of enemies.
Mercury's Treads
This item is also great against a team of CCers, just keep in mind it would supplement your Sorcerer's Shoes early game, so you will be dealing slightly less damage overall until you get your Void Staff. It might be worth it to have slightly less damage early game, however, if it means that you can get CC reduction against a team full of CC that could mess you up otherwise for the ENTIRE game.
Mejai's Soulstealer
Nothing else at this price (let alone most other items) can provide this much AP. Plus, with the deathcap, not even including the bonus % AP masteries, the total 180 AP from this item with full stacks turns into 234 total AP. And getting stacks, especially with Gragas, isn't as hard as it may seem. Your abilities are so devastating early through late game that you are guaranteed to get a lot of kills and assists. And if you loose some, just get them back! Once you get full stacks, you get 15% CDR, which is helpful when you don't have blue buff or blue elixir on you (although you should basically always have them).
Generally, however, if you end up actually getting to a full build, and you don't know which item you should skip for one of these, drop the
Quicksilver Sash
This item is good against enemies with a lot of CC (Kennen, Morgana, Lux, Vlad, etc) if you do not have cleanse with you. It is cheap and has a cleanse-like active. It removes ALL debuffs from your character. Yes, this includes things that cleanse won't remove, such as damaging debuffs like Vlad's ulti, Malz's ulti, EVERY single debuff to you. Just use the active and
Mercury's Treads
This item is also great against a team of CCers, just keep in mind it would supplement your
Mejai's Soulstealer
Nothing else at this price (let alone most other items) can provide this much AP. Plus, with the deathcap, not even including the bonus % AP masteries, the total 180 AP from this item with full stacks turns into 234 total AP. And getting stacks, especially with Gragas, isn't as hard as it may seem. Your abilities are so devastating early through late game that you are guaranteed to get a lot of kills and assists. And if you loose some, just get them back! Once you get full stacks, you get 15% CDR, which is helpful when you don't have blue buff or blue elixir on you (although you should basically always have them).
However, this is NOT the most reliable item, use it at your own risk. If you are having an exceptionally good game, try to pick it up early. If not, don't bother risking to lose an item slot and a lot of AP and some gold. It also adds a big "FOCUS ME" sign on top of your head, since the enemies will want to do all they can to prevent you from getting to 20 stacks. Be aware that this is a risky item to use, but will reap great rewards if you get a lot of stacks on it without dying.
Blue Buff
______You want to try to grab the blue buff whenever you can with Gragas. Not only does it gives you more CDR so you can cast your abilities and combo more often, but it also gives you more mana regen which equals an easier time spamming all of your abilities that are on a lower cooldown.
______If you have a nice team, they should be able to let you grab blue whenever it is up.
______And if you have a jungler and the enemies do not, try to grab theirs when you can, and when you know it is safe. Ward their jungle, including their blue (obviously), if this is the case. Also, going with a teammate in case of emergency can never hurt.
______If you both have a jungler, you can live without the buff for a little while. Try to talk your jungler into letting you take it mid-late game when he doesn't need it as much, if he doesn't know to do this already, nand try to counter jungle the enemy as much as possible, so that maybe you can take their blue when they don't go for it, or your jungler can take theirs and you can take your team's blue.
______However, if you have a more mana-hungry champion than yourself on you team, such as AP
______That is as in-depth as I am going to go into jungling/counter jungling to pick up blue. If you want more info on this, I would suggest checking out Jebus McAzn's Amumu Guide, DEWO's Warwick Guide, or Restrictnine's Udyr Guide.
Scores
ShadowNet's Scores, Using This Guide!

By: wRAthoFVuLK
Zanato's FIRST NORMAL GAME, Playing Gragas Using This Guide!

If you used my guide and got a good score (which you will), feel free to post the direct link of the screenshot of your score (make sure it is a screenshot from the match history page) in the comments below. I will try to get it up here ASAP. Thanks! :)
If you used my guide and got a good score (which you will), feel free to post the direct link of the screenshot of your score (make sure it is a screenshot from the match history page) in the comments below. I will try to get it up here ASAP. Thanks! :)


0 comentarios:
Publicar un comentario